Welcome back to the Learn Angular 8 in 10 Days article series - Part 3. In the previous article, we discussed the basic concept of Component. Now, in this article, we will discuss the Concept of Data Binding. If you want to read the previous articles of this series, then follow the links.
- What's New Angular 8
- Angular 8: How to start (Day 1)
- Angular 8: Components (Day 2)
So, in this article, we will discuss the concept of Data Binding in Angular 8. Data Binding is one of the most important features of Angular framework. This is because, at any web-based application, data pushing and pulling is always performed a key role in the development. In Angular, this can be done with the help of Data Binding concept very easily.
What is Data Binding?
Data binding is one of the finest and useful features of the Angular framework. Due to this feature, the developer needs to write less code compared to any other client-side library or framework. Data binding in an Angular application is the automatic synchronization of data between the model and view components. In Angular, we can always treat the model as a single-source-of-truth of data in our web application with the data binding. In this way, the UI or the view always represents the data model at all times. With the help of data binding, developers can be established a relation between the application UI and business logic. If we establish the data binding in a correct way, and the data provides the proper notifications to the framework, then, when the user makes any data changes in the view, the elements that are bound to the data reflect changes automatically.
Basic Concept of Data Binding
In case of any web-based application development, we always need to develop a connection bridge between the back end, where data is stored and the front end or user interface through which user performs their application data manipulation. Now, this entire process always depends on consecutive networking interactions, repetitive communication between the server (i.e. back end) and the client (i.e. front end).
Due to the consecutive and repetitive communication between client and server, most web framework platforms focus on one-way data binding. Basically, this involves reading the input from DOM, serializing the data, sending it to the back end or server, and waiting for the process to finish. After that, the process modifies the DOM to indicate if any errors occurred or reload the DOM element if the call is successful. While this process provides a traditional web application all the time it needs to perform data processing, this benefit is only really applicable to web apps with highly complex data structures. If your application has a simpler data structure format, with relatively flat models, then the extra work can needlessly complicate the process and decrease the performance of your application.
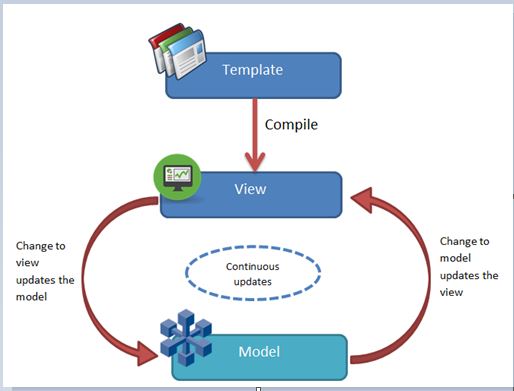
The angular framework addresses this with the data binding concept. Data binding provides a continuous data upgradation process so that when the user makes any changes in the interface that will automatically update the data and vice-versa. In this way, the data model of the application always acts as an atomic unit so that the view of the application can be always updated in respect of the data. This process can be done with the help of a complex series of event handlers and event listeners in many frameworks. But that approach can be fragile very quickly. In Angular Framework, this process related to the data becomes one of the primary parts of its architecture. Instead of creating a series of call-backs to handle the changing data, Angular does this automatically without any needed intervention by the programmer. Basically, this feature is a great relief for the programmer and reduce much more development time.
So, the first and foremost advantage of data binding is that it updates the data models automatically in respect of the view. So, when the data model updates, that will automatically update the related view element in the application. In this way, angular provides us a correct data encapsulation on the front end and it also reduced the requirement to perform complex and destructive manipulation of the DOM elements.
Why Data Binding Required?
From day one, the Angular framework provides this special and powerful feature called Data Binding which always brings smoothness and flexibility in any web application. With the help of data binding, developers can gain better control over the process and steps which are related to the data binding process. This process makes developers life easier and reduces development time with respect to other frameworks. Some of the reasons related to why data binding is required for any web-based application are listed below –
- With the help of data binding, data-based web-pages can be developed quickly and efficiently.
- We always get the desired result with a small volume of coding size.
- Due to this process, execution time increase. As a result, it improves the quality of the application.
- With the help of event emitter, we can achieve better control over the data binding process.
Different Types of Data Binding
In Angular 8, there are four different types of Data binding processes available. They are:
- Interpolation
- Property Binding
- Two-Way Binding
- Event Binding
Interpolation
Interpolation data binding is the most popular and easiest way of data binding in Angular 8. This feature is also available in previous Angular framework versions. Actually, the context between the braces is the template expression that Angular first evaluates and then convert into strings. Interpolation uses the braces expression i.e. {{ }} to render the bound value to the component template. It can be a static string, numeric value, or an object of your data model. In Angular, we use it like this: {{firstName}}.
The below example shows how we can use the interpolation in the component to display data in the front end.
- <div>
- <span>User Name : {{userName}}</span>
- </div>
Property-Based Binding
In Angular 8, another binding mechanism exists, which is called Property Binding. In nature, it is just same as interpolation. Some people also called this process as one-way binding like the previous AngularJS concept. Property binding used [] to send the data from the component to the HTML template. The most common way to use property binding is to assign any property of the HTML element tag into the [] with the component property value, i.e:
To implement the property binding, we will just make the below changes in the previous HTML file from the interpolation sample i.e. interpolation.component.html
- <input type=”text” [value]=”data.name”/>
- <div>
- <input [value]="value1" />
- <br /><br />
- </div>
Event Binding
Event binding is another of the data binding techniques available in Angular. This data binding technique does not work with the value of the UI elements—it works with the event activities of the UI elements like click-event, blur-event, etc. In the previous version of AngularJS, we always used different types of directives like ng-click, ng-blur to bind any particular event action of an HTML control. But in the current Angular version, we need to use the same property of the HTML element (like click, change, etc.) and use it within parentheses. In Angular 8, for properties, we use square brackets, and in events, we use parentheses.
- <div>
- <input type="submit" value="Submit" (click)="fnSubmit()">
- </div>
Two-Way Data Binding
In Angular Framework, the most used and important data binding techniques are known as Two-Way Data Binding. Two-way binding is mainly used in the input type field or any form element where the user can provide input values from the browser or provides any value or changes any control value through the browser. On the other side, the same is automatically updated into the component variables and vice versa. Similarly, in Angular 8 we have a directive called ngModel, and it needs to be used as below:
- <input type=”text” [(ngModel)] =”firstName”/>
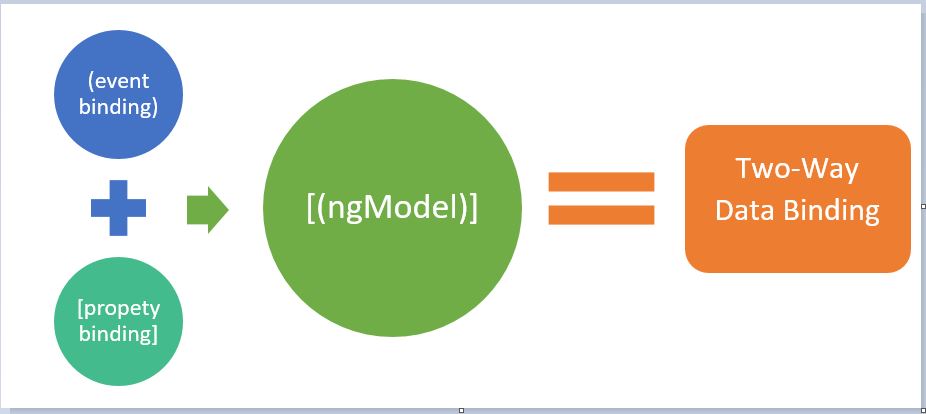
ngModel performs both property binding and event binding. Actually, property binding of the ngModel (i.e. [ngModel]) performs the activity to update the input element with a value. Whereas (ngModel) ( (ngModelChange) event) instructs the outside world when any change occurred in the DOM Element.
The below example demonstrates the implementation of two-way binding. In this example, we define a string variable called strName and assign that variable with a Textbox control. So, whenever we change any content in the textbox, the value of the variable will be changed automatically.
- <div>
- <input [(ngModel)]="strName" type="text"/>
- </div>
@Input() Decorator
In Angular Framework, each and every component used either as a stateless component or stateful component. Normally, the components are used as a stateless way. But sometimes we need to use some stateful components. The reason behind the using a stateful component in a web application is due to the data passing or receiving from the current component to either parent component or a child component. So, in this way, we need to intimate Angular that what type of data or which data may come to our current component. To implement this concept, we need to use the @Input() decorator against any variable. The key features of @Input() decorator are as follows:
- @Input is a decorator to mark an input property. With the help of this property, we can define an input parameter property just like normal HTML tag attributes to pass and bind that value into the component as a property binding.
- @Input decorator always provides a one-way data communications from parent component to child component. Using this feature, we can provide some of the value against any property of a child component from the parent components.
- The component property should be annotated with the @Input decorator to act as an input property. A component can receive value from another component using component property binding.
It can be annotated as any type of property, such as number, string, array, or user-defined class. To use an alias for the binding property name, we need to assign an alias name as @Input(alias). Find the use of @Input with the string data type.
- @Input() caption : string;
- @Input('phoneNo') phoneNo : string;
Now, when we use this component, we need to pass the input values as below:
- <demo-app [name]="'Debasis Saha'" [phoneNo]="9830098300"></demo-app>
@Output() Decorator
In Angular 8, @Output is a decorator to normally used as an output property. @Output is used to define output properties to achieve custom event binding. @Output will be used with the instance of Event Emitter. The key features of the @Output() decorator are as follows:
- The @Output decorator binds a property of a component to send data from one component (child component) to a calling component (parent component).
- This is one-way communication from a child to a parent component.
- @Output binds a property of the EventEmitter class. If we assume component as a control, then output property will act an event of that control.
- The @Output decorator can also provide options to customize the property name by using the alias name as @Output(alias). In that case, this custom alias name will act as an event binding property name of the component.
It can be entered in any type of property such as number, string, array, or user-defined class. To use an alias for the binding property name, we need to assign an alias name as @Output(alias). Find the use of @Output with the string data type.
Just like Input decorator, output decorator also need to first declare as below –
Now, we need to raise the emitter from a point within the component so that the event can be raised and tracked by the parent component.
If we want to pass any value through this event emitter, then we need to pass that value as a parameter through the emit().
In the parent component, that output property will be defined as below –
Just like Input decorator, output decorator also need to first declare as below –
- @Output('onSubmit') submitEvent = new EventEmitter<any>();
- this.submitEvent.emit();
In the parent component, that output property will be defined as below –
- <demo-app (onSubmit)="receiveData($event)"></demo-app>
Demo 1: Interpolation
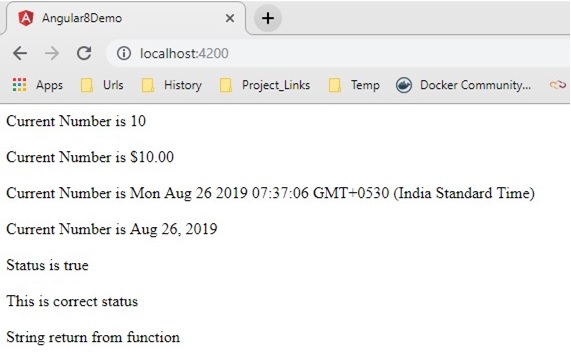
Now, in this demo, we will show how to use or implement Interpolation in Angular 8 application for different data types.
app.component.ts
- import { Component } from '@angular/core';
- @Component({
- selector: 'app-root',
- templateUrl: './app.component.html',
- styleUrls : ['./custom.css']
- })
- export class AppComponent {
- public value1: number = 10;
- public array1: Array<number> = [10, 22, 14];
- public dt1: Date = new Date();
- public status: boolean = true;
- public returnString(): string {
- return "String return from function";
- }
- }
- <div>
- <span>Current Number is {{value1}}</span>
- <br /><br />
- <span>Current Number is {{value1 | currency}}</span>
- <br /><br />
- <span>Current Number is {{dt1}}</span>
- <br /><br />
- <span>Current Number is {{dt1 | date}}</span>
- <br /><br />
- <span>Status is {{status}}</span>
- <br /><br />
- <span>{{status ? "This is correct status" :"This is false status"}}</span>
- <br /><br />
- <span>{{returnString()}}</span>
- </div>
Now, the output of the above code is as below -
Demo 2: Property-Based Binding
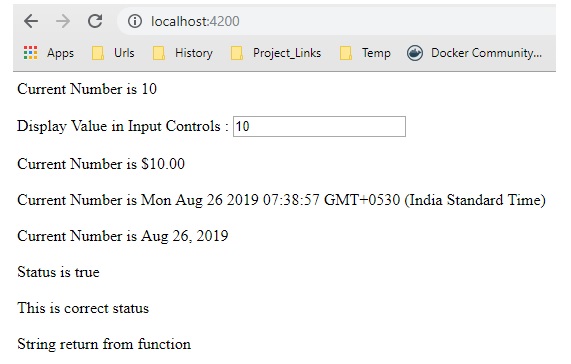
Now, in this demo, we will demonstrate how to use Property-Based binding in Angular 8. For that, we will add one input type text box in the app.component.html file and bind the text box with variable value1 using property binding.
app.component.html
- <div>
- <span>Current Number is {{value1}}</span>
- <br/><br />
- Display Value in Input Controls : <input [value]="value1" />
- <br /><br />
- <span>Current Number is {{value1 | currency}}</span>
- <br /><br />
- <span>Current Number is {{dt1}}</span>
- <br /><br />
- <span>Current Number is {{dt1 | date}}</span>
- <br /><br />
- <span>Status is {{status}}</span>
- <br /><br />
- <span>{{status ? "This is correct status" :"This is false status"}}</span>
- <br /><br />
- <span>{{returnString()}}</span>
- </div>
Demo 3: Event-Based Binding
In this demo, we will demonstrate how to implement event-based binding in Angular 8.
app.component.ts
- import { Component } from '@angular/core';
- @Component({
- selector: 'app-root',
- templateUrl: './app.component.html',
- styleUrls : ['./custom.css']
- })
- export class AppComponent {
- public showAlert() : void {
- console.log('You clicked on the button...');
- alert("Click Event Fired...");
- }
- }
app.component.html
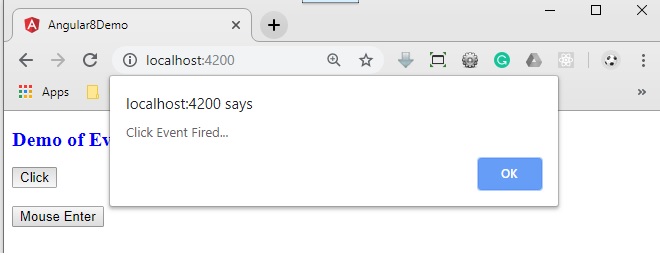
- <div>
- <h2>Demo of Event Binding in Angular 8</h2>
- <input type="button" value="Click" class="btn-block" (click)="showAlert()" />
- <br /><br />
- <input type="button" value="Mouse Enter" class="btn-block" (mouseenter)="showAlert()" />
- </div>
Now, check the output in the browser:
Demo 4: Two Way Data Binding
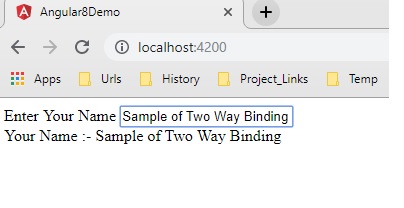
Now, in this demo, we will demonstrate how to use two-way data binding in angular. For this purpose, create the below-mentioned components.
app.component.ts
- import { Component } from '@angular/core';
- @Component({
- selector: 'app-root',
- templateUrl: './app.component.html',
- styleUrls : ['./custom.css']
- })
- export class AppComponent {
- public val: string = "";
- }
app.component.html
- <div>
- <div>
- <span>Enter Your Name </span>
- <input [(ngModel)]="val" type="text"/>
- </div>
- <div>
- <span>Your Name :- </span>
- <span>{{val}}</span>
- </div>
- </div>
Now, when we use ngModel or two-way data binding in our components, then we need to include FormsModule of Angular in our own defined app module file as below. Since ngModel will not work without this FormsModule.
- import { BrowserModule } from '@angular/platform-browser';
- import { NgModule } from '@angular/core';
- import { FormsModule } from '@angular/forms';
- import { AppComponent } from './app.component';
- @NgModule({
- declarations: [
- AppComponent
- ],
- imports: [
- BrowserModule,FormsModule
- ],
- providers: [],
- bootstrap: [AppComponent]
- })
- export class AppModule { }
Now, check the output in the browser –
Demo 5: Pass Input Value into Component
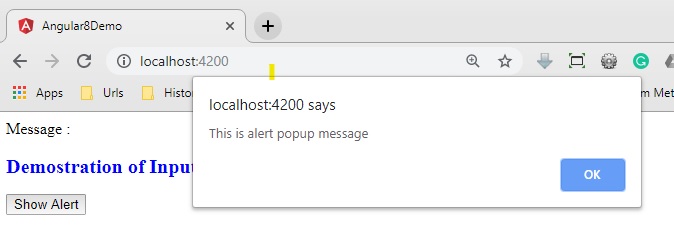
In this demo, we will demonstrate how to use or implement the input property of a component. For that purpose, we need to develop first one component in which input property will be defined.
message.component.ts
- import { Component, Input } from '@angular/core';
- @Component({
- selector: 'message-info',
- templateUrl: './message.component.html',
- styleUrls : ['./custom.css']
- })
- export class MessageComponent {
- @Input() public message :string = '';
- @Input('alert-pop') public message1 :string= ''
- public showAlert():void{
- alert(this.message1);
- }
- }
message.component.html
- <div>
- Message : <h2>{{message}}</h2>
- <input type="button" value="Show Alert" (click)="showAlert()"/>
- </div>
Now, we need to consume this message-info component into another component and need to pass the input value using input properties.
app.component.ts
- import { Component } from '@angular/core';
- @Component({
- selector: 'app-root',
- templateUrl: './app.component.html',
- styleUrls : ['./custom.css']
- })
- export class AppComponent {
- public val: string = "This is alert popup message";
- }
app.component.html
- <div>
- <message-info [message]="'Demostration of Input Property of a Component'" [alert-pop]="val"></message-info>
- </div>
Now, check the output at the browser –
Demo 5: Return Output Value from a Component
Now in this demo, we will discuss how to use output property of any component. For that purpose, we make the following changes in the message-info component to define output property.
message.component.ts
- import { Component, Input, EventEmitter, Output } from '@angular/core';
- @Component({
- selector: 'message-info',
- templateUrl: './message.component.html',
- styleUrls : ['./custom.css']
- })
- export class MessageComponent {
- @Input() public message :string = '';
- @Input('alert-pop') public message1 :string= ''
- @Output() onSignup = new EventEmitter<any>();
- public data:any={};
- public showAlert():void{
- alert(this.message1);
- }
- public onSubmit() :void{
- this.onSignup.emit(this.data);
- }
- }
message.component.html
- <div>
- Message : <h2>{{message}}</h2>
- <input type="button" value="Show Alert" (click)="showAlert()"/>
- <br/><br/>
- Provide Full Name : <input type="text" [(ngModel)]="data.name">
- <br/>
- Provide Email Id : <input type="email" [(ngModel)]="data.email">
- <br>
- <input type="button" value="Sign Up" (click)="onSubmit()"/>
- </div>
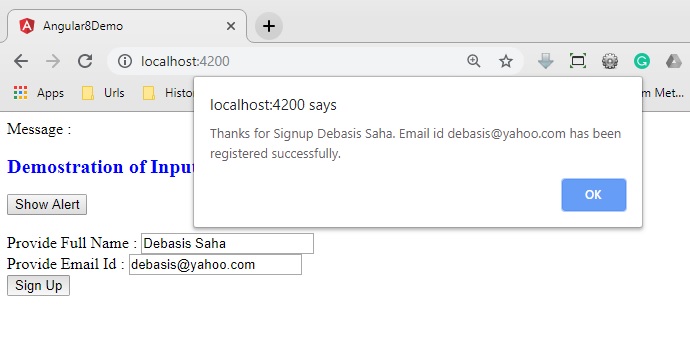
So, in the above part, we defined an output property called onSignup() within the message-info component. Now, we need to consume that event in the parent component as shown below –
app.component.html
- <div>
- <message-info [message]="'Demostration of Input Property of a Component'" [alert-pop]="val" (onSignup)="onSignup($event)"></message-info>
- </div>
app.component.ts
- import { Component } from '@angular/core';
- @Component({
- selector: 'app-root',
- templateUrl: './app.component.html',
- styleUrls : ['./custom.css']
- })
- export class AppComponent {
- public val: string = "This is alert popup message";
- public onSignup(data:any):void{
- let strMessage:string ="Thanks for Signup " + data.name + ". ";
- strMessage += "Email id " + data.email + " has been registered successfully.";
- alert(strMessage);
- }
- }
Now refresh the browser to check the output –
No comments:
Post a Comment